I blame add issan and Pid
- Thread starter scunnycougar
- Start date
You are using an out of date browser. It may not display this or other websites correctly.
You should upgrade or use an alternative browser.
You should upgrade or use an alternative browser.
i looked on the pc , only way i could see them  . nice job , it's all about patience and not panicking if you bugger it up , looks like you're doing a sterling job
Sent from my bed using morse code
. nice job , it's all about patience and not panicking if you bugger it up , looks like you're doing a sterling job Sent from my bed using morse code
yeah its better than Apples contractual piece of poo, IOS = Input and Output are S**tMust be an Android thing then.


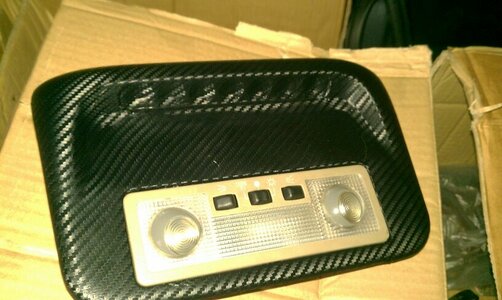
Latest trial....cutting the circles accurately for the warning lights stumped me a touch though
Si, get yourself a hole punch mate
No. Get a punch the same diameter as the hole. The punch has a razor edge, so you use a screwing action  to cut through. Either that or use a modelling knife to cut into segments, 4 cuts should be plenty, then push the tip of your little finger through the hole
  taking the vinyl through, then fold the segments at the back of the panel.
to cut through. Either that or use a modelling knife to cut into segments, 4 cuts should be plenty, then push the tip of your little finger through the hole taking the vinyl through, then fold the segments at the back of the panel. No. Get a punch the same diameter as the hole. The punch has a razor edge, so you use a screwing action
The modelling knife is the way forward i think and fold the wrap back through the hole, I have realised today, When i did the headlight switch panel in the car i cut the hole out completely, and with the heat we have had recently it's started to unwrap from where i did not wrap and fold back through the hole for the switch..
I was going to buy some more wrap and re-wrap it, but have since found a few real carbon wrapping kits for not much more money than the di-noc stuff, so that will be my next attempt.. i will start with the headlight switch panel then move up to the larger bits...
")
Done the spotty rubbers and very happy with the results.
Also, pictured the comparison between the real carbon fibre winglets and the vinyl strips.
Hey Si, that looks great mate - good job. So basically you apply this stuff and just give it some heat with a hair dryer?
Thought I would have a dabble with the old vinyl wrapping.
Far from perfect and a simple piece to experiment on, but I will be spending some time tomorrow on a couple of other bits.
Looks crap

I little more to it Tim, but that's the general jist
Hmmm....may give it a go once moved and I have a garage to play in...lol
i have made a few mistakes, but its all an experiment at the mo
Same as me, it's quite easy to over heat the wrap, and also easy to over stretch it too...